
Converging Verticals..
Or keystoning, as it’s more correctly termed, is a factor of photography. When you photograph buildings, keystoning occurs whenever you either point your lens up or down from the horizontal. The result is the lines of the building will appear to converge at the top or, when shooting from a high vantage point at the bottom, of the picture.
This isn’t the effect of lens distortion as many people believe but rather a factor of perspective when capturing a 3 dimensional world on a 2 dimensional medium. The effect may appear more pronounced with wide angled lenses simply because wide angled lenses are more powerful at creating a sense of perspective.
This effect can be avoided by keeping your lens absolutely horizontal, and there are spirit levels you can fit to the flash shoe of your camera to enable this. But, in the case of the cathedral shot below, as I’m not able to levitate to a central point somewhere above the cathedral floor, I had to point my lens upwards to capture the fabulous vaulted ceiling.
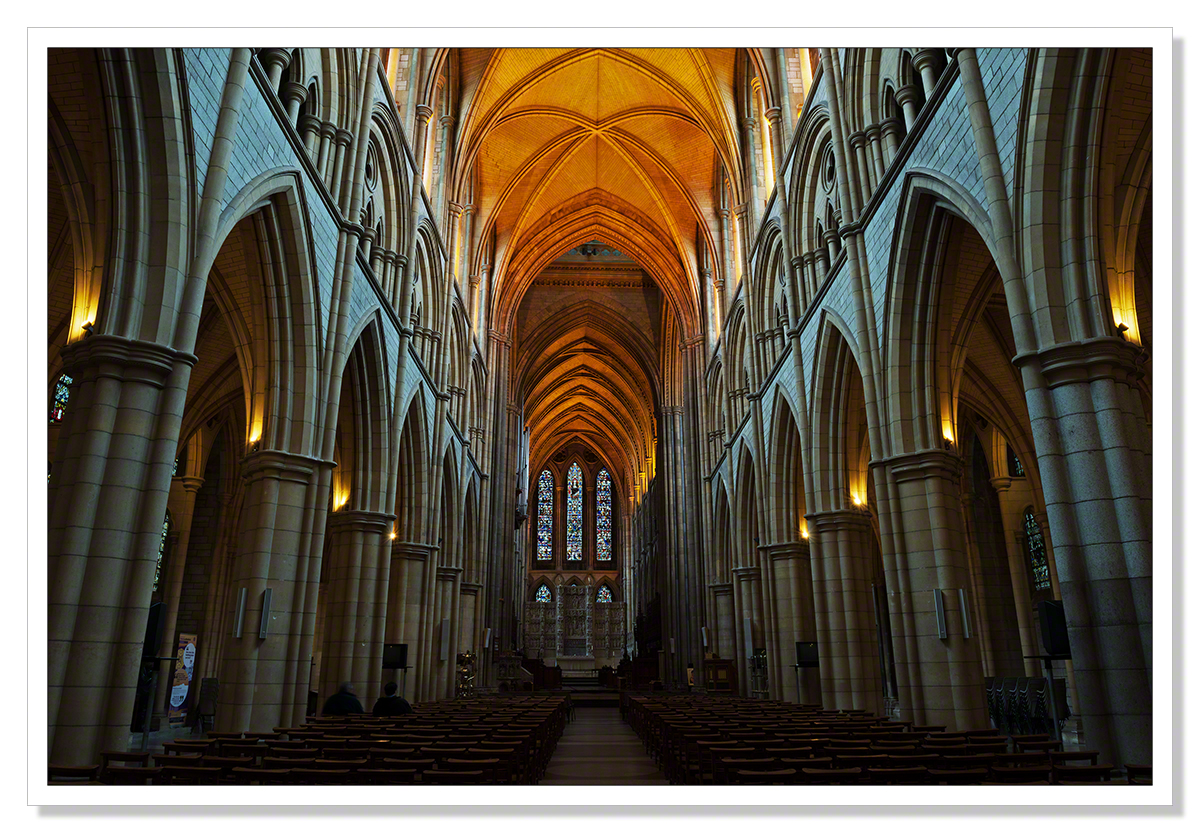 24mm f/20 5 sec. ISO-100
Because of this however, the pillars of the cathedral appear to lean inwards, the effect more pronounced at the edges of the picture. There is a however a way to fix this, well two ways, that I know of in Photoshop.
In Photoshop CS5 and earlier, one of the quickest and easiest ways is to use the distort tool to straighten the verticals. If you have Adobe CS6 there is a powerful new tool called the Adaptive Wide Angle filter and I’m grateful to Noeline for pointing me in the right direction and suggesting this as an alternative to the distort method.
In the tutorial below, I show you how to use both methods. This is something that I’ve only just recently learnt to do myself having encountered this problem on a project I’m currently working on. I was using my ultra-wide 14-24mm lens and I needed a way to correct some of the keystoning. I figured the distort tool might just work, and it did. I’d played around with the distort tool for fun and it’s a great way to learn Photoshop. To save you discovering this by accident however, I thought I’d share what I learnt. I hope you find this video helpful. The quality of the video was great until I uploaded to WordPress so I guess WordPress is heavily compressing the video. I think you can still follow it however..
Sometimes of course, the keystoning effect can add greatly to the impact of a picture and you wouldn’t want to straighten the vertical or horizontal lines but other times straightening the verticals is the way to go.
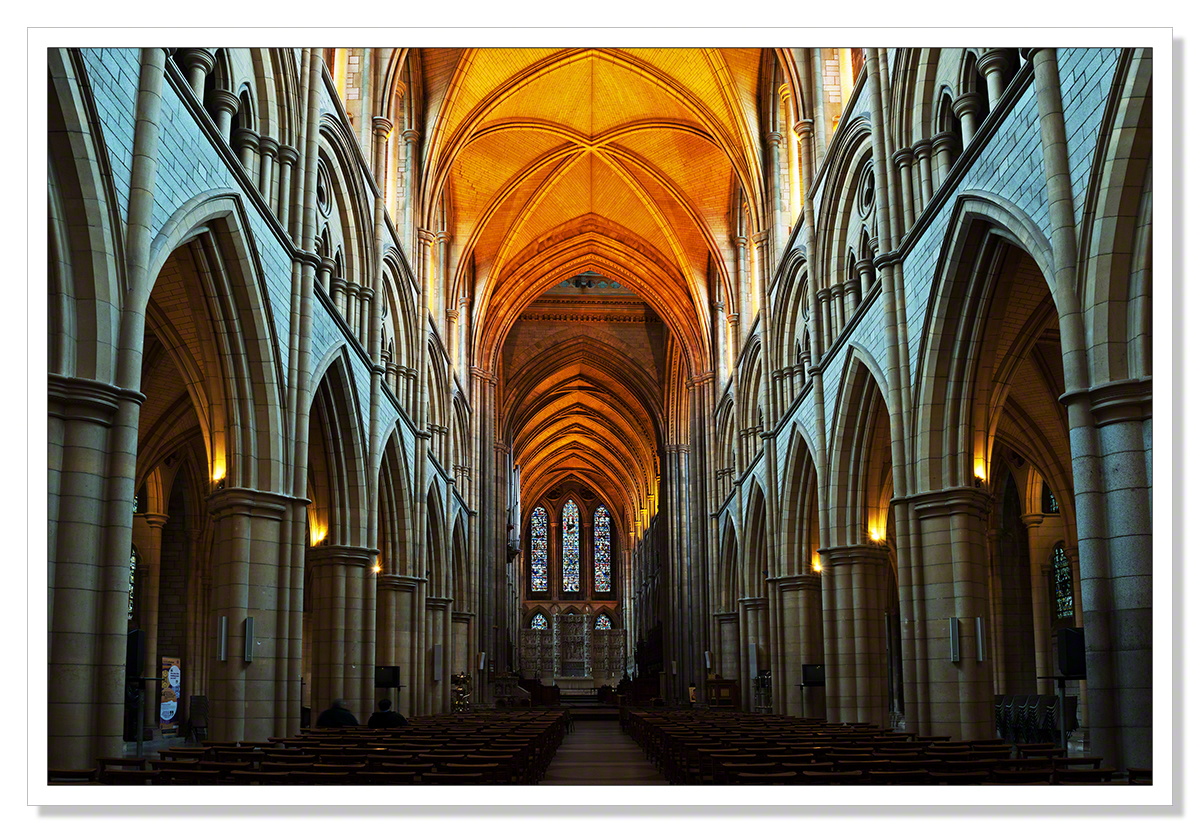
This is the corrected picture, the converging verticals straightened out using the tools in the tutorial video and I think it’s an improvement. It’s opened up the picture and is a more accurate representation of the way I saw the cathedral..
![]()
![]()

![]()


Interesting post this Adrian. Personally I quite like the effect of keystoning, as you say it can add drama to an image.
April 7, 2014 at 5:52 pm
Thanks Mark. It most certainly can add drama but when using a super-wide angle lens all day, you don’t necessarily want to advertise the effect in every shot. Too much of a good thing and all that. :-)
April 7, 2014 at 6:37 pm
Thanks for this great tutorial, Adrian. It’s highly appreciated – I must admit, I didn’t know the new tool.. Great photos as always!
Best regards, Dina
April 7, 2014 at 6:19 pm
Thank you Dina. The new tool really is good and one I’m sure I’ll be using quite often as I use a 14-24mm lens a lot. As I said to Mark, keystoning can be an interesting and dramatic as I pointed out in the post, but you don’t necessarily want it in every shot.
April 7, 2014 at 6:44 pm
I know. I had a beautiful shot taken with the 14-24mm, but the leaning lamp post ruin it… Thanks again!
April 7, 2014 at 6:54 pm
You’re very welcome!
April 7, 2014 at 6:59 pm
For those who don’t have Photoshop, DxO View Point does the same thing, and can be run from inside Lightroom (I assume Aperture as well).
And yes, beautiful photo.
April 7, 2014 at 7:16 pm
Fantastic!
April 7, 2014 at 9:22 pm
Thank you Lou! Much appreciated as always.
April 7, 2014 at 10:11 pm
Easy when you know how ;-) Thanks for the tutorial ChillB… with three stunning Cathedrals to choose from so close by there’s no excuse ….
April 7, 2014 at 9:28 pm
You’re very welcome Poppy. These cathedrals do make such great photography subjects. Just watch those permits and what you may be signing away when you purchase one. ;-)
April 7, 2014 at 10:13 pm
For those with canon cameras, their dpp software has a similar feature. Or the old school method of using a camera/lens with movements (eg a tilt/shift lens on 35mm cameras)…
April 7, 2014 at 9:58 pm
Thanks for that Johann. I don’t think that most of us have tilt/shift lenses but as you say, this is the way to tackle the problem in camera. Good to know about the Canon software, I expect Nikon have similar. For someone whose workflow is so Photoshop-centric, this works for me so I thought I’d share it.
April 7, 2014 at 10:11 pm
Thanks for the info Adrian. I needed to fix a similar problem with a home I was photographing for a local publication. The distort tool got me pretty close to where I needed to be, but I hadn’t heard of the Adaptive Wide Angle Filter. Appreciate the heads-up! (and your photo is glorious!!)
April 7, 2014 at 11:17 pm
Thank you Tina. Much appreciated.
April 8, 2014 at 7:09 am
I found your video clip to be very interesting and informative. I have never used Photoshop before and your instructions were very simple. I think the first method would be my preference as it seems simpler. I am saving it to my “photo tips” file. Thanks for sharing.
April 7, 2014 at 11:20 pm
Thank you very much Mrs P. :-)
April 8, 2014 at 7:09 am
Awesome post Adrian! So informative and beautiful images as well! Thanks so much! I’m sitting here wondering what would happen if shooting from a balcony..would the angle change enough to avoid the keystoning if shooting horizontal? Take good care!
April 8, 2014 at 1:38 am
Hi Robyn, thanks for you comment. Your balcony would need to be halfway between the bottom and the top of the building or offending verticals, to avoid any keystoning with your camera horizontal. So in the cathedral, I would have had to levitate halfway between the floor and the vaulted ceiling and then, with my camera level, I wouldn’t have had any problem. Hope that’s clear. Thanks for your interesting question. :-)
April 8, 2014 at 7:08 am
Thank you for this very informative post. I use Nikon Capture NX2 which does not seem to have an equivalent function. …. Have you ever tried using a Tilt and Shift lens? It solves the problem but at a very high cost!
April 8, 2014 at 1:32 pm
You’re welcome Rhys. Yes the tilt shift lenses will do it but like you say, at a cost. This is very quick and easy! :-)
April 8, 2014 at 3:21 pm
I’m still using CS5 and regularly resort to Transform to correct problems that straightforward Lens Correction fail to solve. The new tool in CS6 looks like it could be very useful. Excellent tutorial and the result is superb, Adrian.
April 8, 2014 at 5:52 pm
Thank you Andy. Much appreciated. The new tool did eat rather more of my picture than I’d have liked but it certainly did the job! I can see it being useful.
April 9, 2014 at 9:14 am
Hi Chillbrook, Just returned from a desert trip where one morning I was perusing a photography book and came across the term keystoning. Thank you as always for a very informative tutorial, I so appreciate it when you share your expertise. :-) Hope all is well. Kind regards, Viv
April 8, 2014 at 7:16 pm
Thank you Vivian. It’s always nice to be appreciated. These tutorials do take quite a long time to put together so I hope that people find them useful. All is well thank you, I hope the same for you. :-)
April 9, 2014 at 9:18 am
Excellent photo to illustrate the topic. And…I learned something today. Nice.
April 8, 2014 at 11:02 pm
Thank you Phil!
April 9, 2014 at 9:18 am
As you said, sometimes it might be fine to keep that leaning in look, but in this photo, your improvements make a lot of sense – great idea to do the tutorial.
April 9, 2014 at 10:48 pm
Thank you Lynn! :-)
April 10, 2014 at 12:34 pm
Good, easy to follow tutorial Adrian. The other method that I use (and forgot to mention – sorry!) is the ‘perspective crop tool’ – usually my tool of choice.
April 12, 2014 at 8:38 am
Thanks Noeline. There do seem to be lots of methods of achieving the same goal. I will take a look at the perspective crop tool.. :-)
April 12, 2014 at 9:41 am
I know your post is mainly about post-editing, but I had to comment on the photo. It’s very well done … I really love Gothic architecture, and all the great European cathedrals that were built during that time. Sadly, we in America missed out on all the arches and flying buttresses. :-)
April 13, 2014 at 2:21 am
Thank you John, Truro is a very fine example. :-)
April 13, 2014 at 8:00 am
Pingback: 3D Photography and 3D Video » Olympus E-M1 firmware update will add “keystoning” feature