
How to Photograph the Milky Way

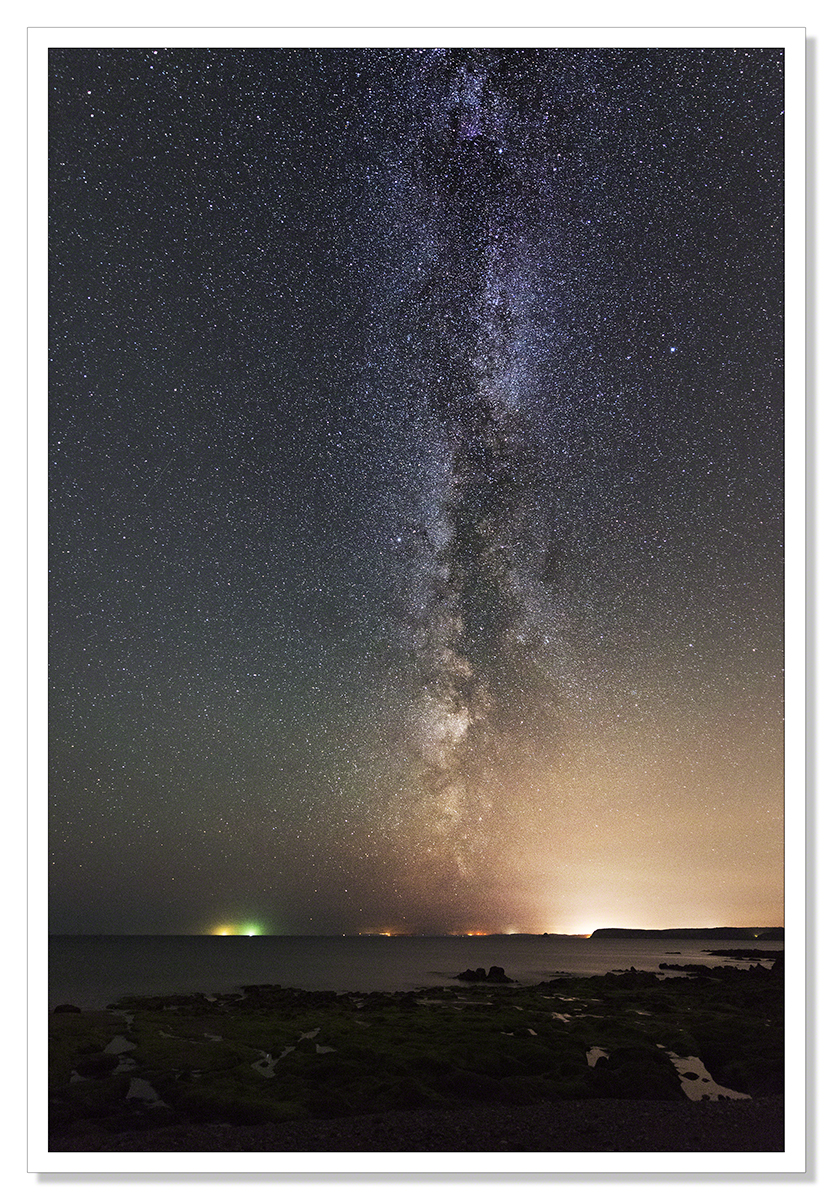
This tutorial covers the basic steps necessary to capture images like the one above. Our galaxy, the Milky Way, is shaped, as the late Sir Patrick Moore, (a BBC, well actually, national institution described it, a man who presented a late night astronomy programme for 55 years) like two fried eggs back to back. We live about halfway across the white. It’s about 25,000 light years to the centre of the galaxy and about 25,000 light years to the edge. With light travelling at 186,000 miles per second, getting your head around how far light can travel in an hour, let alone a year and then multiplying that by 25,000 to get to either the edge or the centre of the galaxy from where we are situated, it really is quite mind-boggling.
The size, the complexity, the multitude of stars and planets, standing on a beach or a cliff top with a camera pointed at the night sky, looking towards the edge of the galaxy that stretches like a huge arch above our heads, one really can feel very small and insignificant indeed. I had a little chuckle to myself, remembering ‘The Hitchhiker’s Guide to the Galaxy’ where in the opening chapter, Earth was demolished to make way for an intergalactic highway. With all attempts to contact us having been ignored, so wrapped up in the idea that we are the only ones, the highway was going ahead unchallenged and that was it, Earth was no more and the intergalactic bulldozers trundled on remorselessly.
Find a nice dark Sky
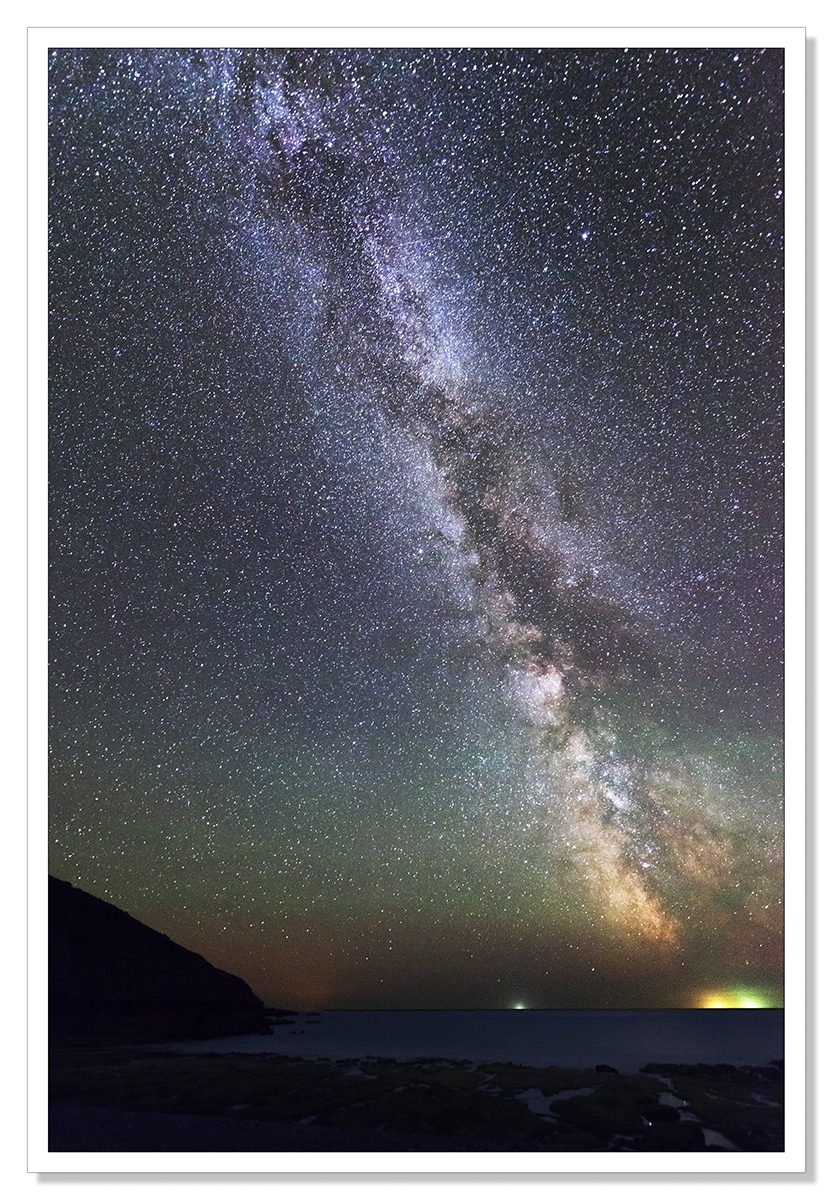
The first step is finding a dark sky without light pollution. This is becoming increasingly difficult as towns and cities spread. I’ve been using a website called Blue Marble to find areas local to me that should be dark, or at least dark enough to capture these images. I have a certain advantage in being able to find a nice flat relatively dark horizon looking out to sea but even then, darkness can not be guaranteed. The orange glow in the image above comes from a trawler or tanker. In the picture below the glow from Falmouth, and a few more towns around the coast plus what I think are navigation lights from a fishing trawler that was coming and going across the horizon clearly impact on the image but not disastrously so. The orange glow from the sodium lighting used the world over will wash out the further stars from your Milky Way image so really, get as far away as possible from towns and cities.
Locating the Milky Way
Once you’ve found yourself a nice dark area of countryside, you need to find the Milky Way. The best advice I can offer here is to look for what could be a ribbon of clouds across the sky on a clear night. The billions of stars that make up the Milky Way can appear just like that but if you look more closely at the cloud you’ll see that it’s made up of stars. To be more exact, the Milky Way extends from the constellation Scorpius (Scorpio) to the constellation Cygnas, (the swan) particularly the area closest to Sagittarius. There are a myriad number of apps available for smart phones that will help you locate what we’re talking about if you’re still nonplussed or if light pollution is obscuring the best of the Milky Way. Here in the UK at the moment the Milky Way can be seen directly overhead extending north-east to south-west at around midnight. Summer is a good time to see the Milky Way. In winter the sun is in the constellation Sagittarius introducing cosmic light pollution. The moon can also be a culprit so it’s best to view during the Lunar cycle when the moon is absent or new.
Tripod
Right, you’ve found a dark sky and you’ve located the Milky Way, what you now need is a sturdy tripod. With exposure times extending to 30 seconds, you cannot hold your camera still for that time. That said, don’t let not having a tripod hold you back. If you don’t have a tripod you could lay your camera on its back and set the self-timer. Setting the self-timer allows for the shutter to fire without jogging the camera.
Lens
To get the widest field of view, to get more of the Milky Way into your photograph, wide angled lenses are best. A typical kit lens would be 18-55mm. 18mm is a good starting point. If you can go wider, all the better. Faster lenses are better. By that I mean lenses that allow you to open the aperture to around f1.4, 2.8 or 3.5. This is simply because the wider the aperture, the more light you can collect on your sensor in the time the shutter is open.

Shutter Speed
We’re on the move as a planet, when you start taking pictures of the stars with long exposures, you’re going to get star trails if that exposure time is too long. To photograph the Milky Way we want to slow the shutter as much as possible before the star trails become too apparent. For this we use the 500 rule. Divide 500 by the focal length of your lens to arrive at a maximum exposure time before star trails appear. Wider angle lenses are better as they are going to give you a longer shutter speed allowing more star light to be collected by your sensor. I’ve been using a Nikkor 14-24mm f2.8.
Aperture
Set your aperture to its widest. As I’ve mentioned, ideally this will be between f1.4 and 3.5. If your lens doesn’t open that wide, it’ll be harder to get an image but not impossible. With a wide aperture however comes a narrow depth of field so you need to be quite precise in your focusing.
ISO
To get enough light on your image sensor, you’re going to have to make it more sensitive to light. This means upping the ISO to anything between ISO 1600 and ISO 6400. The higher the ISO, the more noise will be introduced into the image. I’ve experimented with higher ISO’s and shorter shutter speeds. Really it’s a trade-off. You’ll need to find the best shutter speed/ISO combination that works best for you. I have found with my Nikon D800e that even at ISO 6400 the noise factor isn’t any more troublesome than at ISO 1600. Hence, I’ve been able to set faster shutter speeds to get ultimately a sharper image of the stars. Faster shutter speeds mean less star blur. Despite the introduction of noise at such high ISOs, I’ve printed these images at A3 and they look really good.
Focusing on the Milky Way
You need to set your lens to infinity to get the Milky Way in focus. This is difficult to do on a dark night with no moon to provide a focus point for auto-focus to operate. You’re not going to see anything looking through your viewfinder, the camera is blind. If you have an infinity mark on your lens be wary of just setting to that mark. In my experience setting the lens at the infinity mark will not give you the sharpest picture. It should, and I’m not entirely sure why it doesn’t on a lens costing £1500 but there you are. Perhaps someone could explain that one to me. Anyway, what you really need to do is focus on a distant object while it’s still light enough for your auto-focus to operate. Once you’ve focused, switch the lens to manual and leave the focus ring alone.
This is all well and good but if you want to add foreground interest to your image, given a very wide aperture, if your stars are in focus, your foreground will not be. I have experimented with setting the lens at the hyperfocal distance which, according to the depth of field calculators (numerous ones available for smartphones), at f2.8 on a full frame camera, focusing on a point just 0.83m should give you a sharp image from half a meter in front of the camera to infinity. Sounds too good to be true and it is. This method gives you a very sharp foreground and the stars are OK but they will not be as sharp as they could be. The solution is to focus one image at infinity, and another at the hyperfocal distance and merge the images in Photoshop. If you shine a torch at the hyperfocal distance for whatever f-number you’re using (lots of depth of field apps available for smartphone) for foreground, (ideally f/8 or f/11 with a very long exposure), auto-focus will pick up the point. Once you’ve done that however, you’ve lost your infinity focus and no longer have the option to refocus to infinity because it’s dark. My solution has been to take very careful note of where the focus ring is set when auto-focussing on a distant object. I’ve then been able to return the lens to that point when I’m ready to shoot the stars once more. It’s a bit woolly and if your lens doesn’t have a focus distance scale on it, it’s difficult to do. Some trial and error is going to be required to find what works best for you, your camera and your lens.
That’s it, all you need to start capturing pictures of the Milky Way. Once you have your images and are back at home in front of the computer with a nice cup of tea, you’ll need to process them. I use Photoshop to process my images. Regardless of the software you use to process your pictures, the first thing you are likely going to want to adjust is the white (or colour in Photoshop) balance to remove any colour cast. You can then set about increasing contrast to bring out the detail. There are many tools available to help you get the best of your images these include Topaz Labs ‘Adjust’ and one of my favourites, Topaz DeNoise. If you don’t have Photoshop, it’s available as a full working trial via the Adobe website as are Topaz Lab’s plugins. I’m not going to go into too much detail about the processing of these images as there a million and one ways to go about it but the two most important areas to concentrate on are the white/colour balance and contrast and I’ve mentioned.
Have fun. I hope you find this useful.

![]()


I don’t have the camera equipment to capture photos like this, but oh my, I am so glad you have AND the skills and knowledge to do it so well. Amazing!
July 30, 2014 at 7:31 pm
Thank you so much Jude. :-)
July 30, 2014 at 7:40 pm
Great shots and thanks for posting this. It should save me time experimenting.
July 30, 2014 at 7:57 pm
Thank you Neil, I hope it does.
July 30, 2014 at 8:00 pm
Thanks, Adrian.
I’ll be trying some of this. I’ve played around with snapping star photos before, but not at that high ISO. No need to reply; I’m coming in via Twitter, and there’s no option to subscribe to comments.
July 30, 2014 at 8:42 pm
I SOOOO want to try this. I’ll need a different lens though.
July 30, 2014 at 9:16 pm
Hi Marian, you can use longer lenses it just at 35mm for example, using the 500 rule, you’ve only got a 14 second exposure to capture the stars without star trails. You’ll need a very high ISO but you never know, certainly worth giving it a go as you can bring out a lot of detail in post. Best of luck! :-)
July 30, 2014 at 9:54 pm
Great information en beautiful photo’s of the Milky way.Thanks a lot.
July 30, 2014 at 9:18 pm
Thank you very much Lou. Your comments are always very much appreciated! :-)
July 30, 2014 at 9:55 pm
Wow, that is impressive photograpy, Adrian. I hope to try one day, we have some dark places here…
July 30, 2014 at 10:34 pm
I can imaging you can find some really dark skies in Norway Bente. I’m envious. I’ll look forward to your pictures when you get around to giving this a try. :-)
July 31, 2014 at 11:43 am
Incredibly gorgeous, Adrian! Spellbinding!
July 31, 2014 at 12:44 am
Thank you so much Robyn!
July 31, 2014 at 11:44 am
Excellent post!
Regards
Charles
July 31, 2014 at 8:40 am
Thank you Charles!
July 31, 2014 at 11:42 am
Great photos and very clearly written tutorial, thanks, Adrian!
July 31, 2014 at 9:36 am
Thank you Ron! Much appreciated! :-)
July 31, 2014 at 11:42 am
Adrian – the photos are spectacular, and I appreciate your taking the time to write the tutorial. I am printing it out, and will keep it in my camera bag for reference!
July 31, 2014 at 2:48 pm
Thank you so much Melinda. I really appreciate your comment. Means a lot.
July 31, 2014 at 5:45 pm
Really awesome photos, Adrian. You’ve done the Milky Way proud. :)
July 31, 2014 at 3:37 pm
Thank you Sylvia. :-)
July 31, 2014 at 5:45 pm
Excellent tutorial and images ChillB … I know an awful lot of research and investigation has gone into this post .
Armed with the information you’ve written here to help figure it all out , I think it’s really worth experimenting with – especially for those folks who are fortunate to live in dark sky areas .
Such a glorious sight … and all those people sleeping missing it all :-)
July 31, 2014 at 5:35 pm
Thank you Poppy. It’s definitely worth having a go, and even more so given I managed to capture the spiral shape of another galaxy entirely, confirmed by your BB. That I do find exciting. I thought you needed really fancy telescopes to pick up things like that. I will be pouring over my other images looking for the best shot of it and them perhaps I’ll post. I really appreciate your comments and your collaboration Poppy. What a fun night that was and like you say, so many people missing it by sleeping. :-) x
July 31, 2014 at 5:48 pm
I believe that spiral galaxy must have been your ‘ Catch Of The Night ‘ ChillB :-D
… anticipating one or two more late nights or early mornings again in the near future ..
July 31, 2014 at 6:13 pm
Adrian, your images are just wonderful! How kind of you to share your process and technical details. The Blue Marble site is very cool.
It appears that, yes, Canada does indeed have a lot of land with no light pollution! S,ome of it might be hard to get to though. : ) I should make more of an effort!
July 31, 2014 at 6:24 pm
Great post Adrian…..and that first image is one of the best of it’s kind I’ve seen…..it’s a properly composed landscape shot, but at night with a fabulous star-filled sky.
July 31, 2014 at 6:43 pm
Such a brilliant post and photographs… Very much appreciate your descriptions in revealing all your thoughts/research about how to attempt to produce such shots (this is something I really must attempt). Most of all, I can see your fun and passion in this post as well ~ very cool.
July 31, 2014 at 7:51 pm
Cracking in depth post – which is in essence a reference document – underpinned by some fantastic examples
July 31, 2014 at 9:37 pm
Excellent post Adrian. Thanks for the tips and I think I already told you…love these images.
August 1, 2014 at 2:03 am
Thank you!
August 1, 2014 at 4:02 am
This looks an excellent tutorial at a rapid first glance – I’ve bookmarked it for a more careful read later.
August 1, 2014 at 6:39 am
Beautiful and very impressive photo work!
August 1, 2014 at 7:06 am
Thank you Adrian for such a clear and detailed tutorial. As I said before, I live in a dark area of Australia and am dying to try but this fortnight am in Sydney (capital city) and the worst place for Milky Way shots :( but will be home soon and I can see some sleepless nights coming up. Your images are inspirational if I can get half as good as that I’ll be thrilled.
August 1, 2014 at 11:43 am
Very interesting post, Adrian. I like your tips about the infinity mark on the lens barrel, and using the hyperfocal distance. Light pollution is not all bad, I quite like the effect in your first image.
August 1, 2014 at 2:55 pm
Kudos for presenting a very down to earth guide on how to photograph our ethereal, beautiful Milky Way. What perfection your photos are, too!
August 3, 2014 at 8:38 pm
Pingback: One Sun by Day … | poppytump@number4
THANK YOU so much for this great and inspiring work, Adrian. Right in time! :-) Your images are magnificent and I have saved this tutorial for my next visit to North Norfolk, a place with very little light pollution.
Wishing you a happy weekend, Dina
August 9, 2014 at 4:30 pm
Fine shots and post, Adrian!
August 10, 2014 at 11:54 am
That some post Adrian, but the photos are amazing as always but no doubt very special. Well done and thank you for sharing such information, although I don’t use any of your equipment an I found it very interesting to read. At least I understand why I got couple of black pictures the other night with a basic camera.
August 10, 2014 at 9:28 pm
Awesome images. All most of earthly – no pun intended. My favourite photo is the first one, with the big landscape underneath the Milky Way. It’s a gorgeous time exposure, and I love the colours.
August 26, 2014 at 6:17 pm
Glad you posted this. One of the few things a have yet to perfect, so I’ll try some of what you suggest and hope for the best. :)
September 10, 2014 at 9:36 pm
Thank you again Carlos. I hope some of my suggestions are helpful in getting the most out of photographing the Milky Way.
September 17, 2014 at 6:07 pm
Reblogged this on A+ Photos and commented:
This post is great. Be sure to visit Cornwall Photographic if you like the post.
September 10, 2014 at 9:43 pm
Thank you for the reblog Carlos!
September 17, 2014 at 6:06 pm
In addition to your brilliant images, you have managed to write in such a way as to allow any level of photographer to understand it. That and a pleasant and cheerful tone. You are the man, Adrian.
September 10, 2014 at 11:57 pm
Thank you so much for your kind words Mike. Makes it worth the effort putting together the tutorial if it will genuinely help people try out something new and interesting. :-)
September 17, 2014 at 6:06 pm
Thanks Adrian, for a super tutorial. I really must try this.
September 11, 2014 at 12:08 pm
Thank you Dave, I hope you do give it a try. Photographing the starts and the Milky Way particularly can be very rewarding. On one of my shots I had the swirl of a distant galaxy. Really cool.
September 17, 2014 at 6:09 pm
Pingback: Flash Retrospective – Part IV | Disperser Tracks
Stunning photos. Thanks for the tutorial. ;-)
September 20, 2014 at 4:27 pm
Thank you very much! :-)
September 20, 2014 at 7:40 pm
Thank you very much indeed. I’m glad you enjoyed the photographs.
September 28, 2014 at 7:25 pm
so beautiful, like it very much
July 30, 2015 at 3:29 am
Thank you Sylvia! :-)
July 30, 2015 at 11:11 am